A couple of weeks ago, I was shooting a senior session on a hot and humid Minnesota Friday afternoon. We stopped at a location and I left my iphone in my car for no more than 25 minutes. When I came back, I had the dreaded "Achtung!" temperature warning and the phone was disabled and would not work. Luckily, I brought it in the house, took it out of its otter box case, and let it temper to the ambient air in our house, and all was well.
On that afternoon, the actual temp was in the mid 80's. Granted there was some humidity to boot and it was sort of miserable, but I point it out because that week was NOTHING compared to what we are facing in terms of temperatures and heat indexes this week in Minnesota and throughout the Midwest.
1. Here in Hennepin County, we are under an excessive heat warning until 9:00 p.m. CT on Wednesday, July, 20th.
2. Temps tomorrow and Wednesday will likely be in the high 90's.
3. More importantly though, the heat index will be in the 105 to 115 degree range.
That my friends, will be brutal. Throw in some scattered thunderstorms and rain showers, and we are likely to be in for a tumultuous weather pattern for the next few days that will make the air feel physically wet.
As I have some evening shoots planned this week, I realized not only did I need to prep my clients that these sessions might not be happening, but it's a good time to remind people about how to protect your camera gear, whether you use a simple point and shoot or a high end DSLR.
Here are a few extreme heat tips and tricks for your cameras and gear:
1. Do NOT under any circumstances, leave any camera or flash unit, disks, batteries, or anything else that can be turned on or uses "energy" in a closed up car for any length of time during this kind of a heat spell.
2. This is one time that you don't want to keep your camera snugly packed inside a camera bag, especially a black one (that will attract more heat). Cover it loosely with a white towel to keep it out of the sun, and let whatever air there is circulate around it.
3. Know what temperature your camera is rated for. Simply google your camera make and model with the words "temperature rating" behind it and you should get a result that will provide you with this info. My Canon 5d Mark II is rated to 104 degrees, so if the heat index gets above 100, I will NOT be shooting or even taking my gear outside. When a camera gets exposed to temperatures close to or above it's heat rating, the image sensors and electronic circuits can simply burn up, rendering your camera into a nice book end.
4. If you must shoot outdoors, remember your lenses will need tempering (i.e. time to adjust / get to the ambient temperature outside) and so will the mechanisms inside your camera. You can't simply walk outside from a 68 degree air conditioned environment into 100 degree heat and expect your camera and lenses not to fog up. Wipe all you want, but they will continue to do so until the equipment has tempered to the ambient heat (air). "Fog" is condensation or moisture, and so when you bring cool equipment out into the extreme heat condensation will form. In my opinion, you are asking for moisture to get into the housing (crevices and joints) of your equipment, and this can be a big problem now or later.
5. In order to "temper" your equipment, you should bring the temperature of the camera and lenses up slowly. Whether you can turn up the a/c to a higher temp to help facilitate this or put your equipment in an open room without air but with circulation, it's important that you take enough TIME to do this. Open up all areas of your camera (the battery and disk compartment as well - be sure to remove the battery) so that moisture does not get trapped into some of these areas) as the temperature comes down.
6. Lastly, if it's not safe for your camera to be out in this heat, it probably isn't a good idea to have clients out in it, either. Heat this severe can overtake people quite quickly, especially young children, pregnant women or the elderly, and it just isn't worth it. Take them out for an ice cream instead.
Obviously, the same goes for computer gear as well.
Share the love. Share this post!

Showing posts with label Tips and Tricks. Show all posts
Showing posts with label Tips and Tricks. Show all posts
Monday, July 18, 2011
Friday, July 8, 2011
What do Canon, Shootsac, Sandisk and Pocket Wizards All Have in Common? They are all in photographer Maris Ehlers' bag! | Maris Ehlers Photography
A week or so ago, I was assigned the job of photographing the gear Maris uses to share on the MEP blog, and let me tell you... she's packing some heat!
I was surprised that Maris was willing to share with everyone the gear that she uses, as many photographers would hoard that to themselves. Once again, however, she proves that while gear is important, it's not what makes the photographer.
About half way through this assignment, I realized that she probably had another goal in mind, and that was to get me to research and learn about each of the pieces of equipment that she uses and WHY she uses it. Tricky, tricky!
Let's start with the camera body. A Canon, of course!

Maris has a Canon 5D Mark II. It is an amazing camera. It has so many different features, including a full frame sensor, HD video, in-camera editing, over 20 mega pixels, and much much more.
Not shown is Maris' backup camera body, a Canon 40D. You never know when you may have an equipment malfunction, and her 40D is ready to go just in case.
Next on our list is a crazy handy device called an ExpoDisc. She has two a neutral and warm (she prefers the neutral one, I've found). She uses these to calibrate the white balance in different scenes throughout a shoot. Tricky to learn to use, but once you do you will really notice a difference in the color tone of your images.

Speaking of lighting, flashes are a necessary item to have. You can see these are pretty beat up, but they still work great. Maris uses them both as on camera and off camera flash, with a variety of diffusers and modifiers (a different post, perhaps?), and they work great when she's on the go. Obviously for studio work these are not the flash sources she uses.

I should note that Maris has two of these as well. The second one gets used a lot by her second shooters, and of course also exists to be a back up if needed.
Next is the lens lineup.
1. Canon EF 70-200mm f/2.8 L IS USM
2. Canon EF 100mm f/2.8 USM Macro Lens
3. Canon EF 16-35mm f/2.8 L USM
4. Canon EF 85mm f/1.2 L USM
5. Canon EF 50mm f/1.2 L USM Lens
She also has an 85 mm f1.8 and two other wide angle lenses (not shown here).

Maris' 50mm f/1.2 and 85mm f/1.2 are her favorites for portraits, and she never leaves home without them.

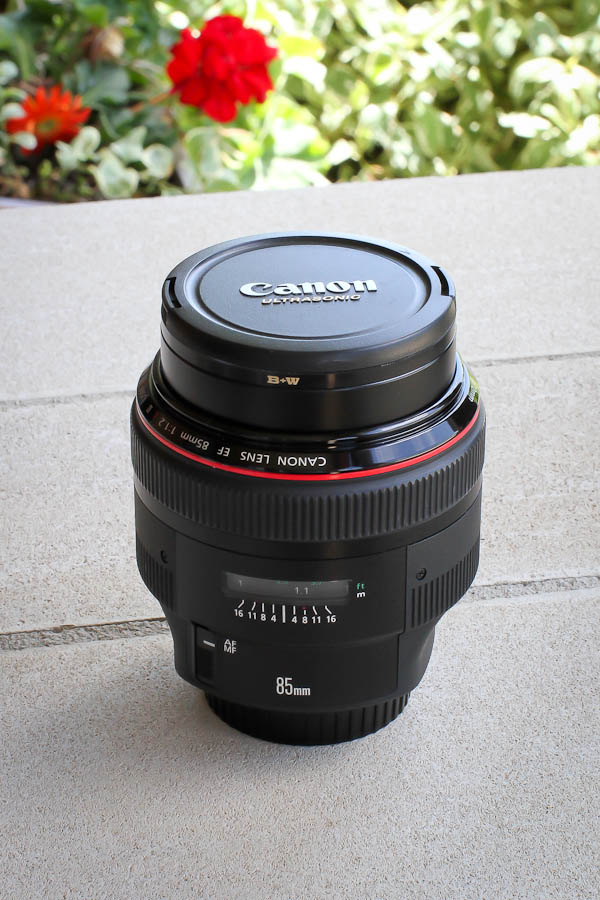
These two lens' both create great, crisp focus on your subject, and generate beautiful blur in the background. Ideal for head shots.
One of my favorites is her 100mm Macro lens.


The final lens in our lineup is Maris' least used lens.


I was surprised that Maris was willing to share with everyone the gear that she uses, as many photographers would hoard that to themselves. Once again, however, she proves that while gear is important, it's not what makes the photographer.
About half way through this assignment, I realized that she probably had another goal in mind, and that was to get me to research and learn about each of the pieces of equipment that she uses and WHY she uses it. Tricky, tricky!
Let's start with the camera body. A Canon, of course!
Maris has a Canon 5D Mark II. It is an amazing camera. It has so many different features, including a full frame sensor, HD video, in-camera editing, over 20 mega pixels, and much much more.
Not shown is Maris' backup camera body, a Canon 40D. You never know when you may have an equipment malfunction, and her 40D is ready to go just in case.
Next on our list is a crazy handy device called an ExpoDisc. She has two a neutral and warm (she prefers the neutral one, I've found). She uses these to calibrate the white balance in different scenes throughout a shoot. Tricky to learn to use, but once you do you will really notice a difference in the color tone of your images.
Speaking of lighting, flashes are a necessary item to have. You can see these are pretty beat up, but they still work great. Maris uses them both as on camera and off camera flash, with a variety of diffusers and modifiers (a different post, perhaps?), and they work great when she's on the go. Obviously for studio work these are not the flash sources she uses.
I should note that Maris has two of these as well. The second one gets used a lot by her second shooters, and of course also exists to be a back up if needed.
Next is the lens lineup.
1. Canon EF 70-200mm f/2.8 L IS USM
2. Canon EF 100mm f/2.8 USM Macro Lens
3. Canon EF 16-35mm f/2.8 L USM
4. Canon EF 85mm f/1.2 L USM
5. Canon EF 50mm f/1.2 L USM Lens
She also has an 85 mm f1.8 and two other wide angle lenses (not shown here).
Maris' 50mm f/1.2 and 85mm f/1.2 are her favorites for portraits, and she never leaves home without them.
These two lens' both create great, crisp focus on your subject, and generate beautiful blur in the background. Ideal for head shots.
One of my favorites is her 100mm Macro lens.
This lens produce stunning close-up images. Maris uses this lens mainly for ring shots at weddings, and other small subjects with a lot of detail.
Maris' "Mega Lens" as I call it, is her 70-200mm lens.
This lens shines at it's 2.8 aperture, and while it doesn't create the same effect as the 50mm or 85mm lens, it can zoom in and out, unlike those lens, and allows for a lot of flexibility. It also creates great bokeh!
This lens is 16-35mm, which in the photography world, is considered a "wide-angle" lens. It's used, mainly, for landscapes and in the event one would like to capture a very large, wide area. Mostly at weddings.
Here's the gear all together (with a few extras, such as a diffuser, some light meters, pocket wizards, and a monopod):
It may not seem like a lot, but when you stop to think that Maris' gear no longer fits in a bag, but requires a suitcase, (two actually, the other used for lighting and accessories) it's a tad mind blowing. It took me a few weeks to understand what each lens does, and what each of their names were.
So, how in the world does Maris carry all of these lenses around during a shoot? She doesn't. One of her favorite pieces of equipment is her Shootsac. She has two of them as well, and we each wear one and they are stuffed with lenses, business cards, cell phones, car keys and extra batteries and disks.
There are six pockets for holding lens', and Maris has a cute cover that makes it uniquely hers. Upon getting to know her, she definitely is a lime green and white polka dot kind of girl!
Lastly, Maris has about 10 or so Sandisk Extreme IV and Pro Series compact flash cards. She won't use anything else!
Feel free to post any questions about Maris' gear here. I'll do my best to answer them, or track her down so she can.
Thanks for reading!
Share the love. Share this post.
Sunday, May 15, 2011
A Indirect Natural Light Photography Tutorial | Maris Ehlers Photography
If you've gone to one of my MEP Photography classes, I talk a lot about shooting in open shade, right near the edge of a line of direct sunlight.
I quickly snapped a couple of head shots of my daughter after getting MOST of her hair cut off today in our... yes, one Facebook follower Keila Pries Gonzalez got it right... garage!


I had her standing just a few feet back from the line of direct sunlight, and then I used a very low aperture (2.8) on a 70-200m lens so that the background would be so blurred it would be nothing more than some well blended colors. One more thing to note: our garage faces direct west, so the sunlight shining in front of the garage was very direct due to it being afternoon here.
After I posted the original picture, I got to thinking that this would be a great visual teachable moment for those who might be interested, so take a peek at the collage below. You can see that the background is made up of much clutter (embarrassingly enough...): a garbage can, the recycling bins, a soccer net, a poster on the wall, some balls and a dog, among other things! :)

The strong light right in front of the garage reflects up and creates a nice even light source on the face.
Give it a try... if you can separate your model from the background enough and shoot with a low aperture (make sure you have plenty of light), it should create a great background for you, too.
I quickly snapped a couple of head shots of my daughter after getting MOST of her hair cut off today in our... yes, one Facebook follower Keila Pries Gonzalez got it right... garage!
I had her standing just a few feet back from the line of direct sunlight, and then I used a very low aperture (2.8) on a 70-200m lens so that the background would be so blurred it would be nothing more than some well blended colors. One more thing to note: our garage faces direct west, so the sunlight shining in front of the garage was very direct due to it being afternoon here.
After I posted the original picture, I got to thinking that this would be a great visual teachable moment for those who might be interested, so take a peek at the collage below. You can see that the background is made up of much clutter (embarrassingly enough...): a garbage can, the recycling bins, a soccer net, a poster on the wall, some balls and a dog, among other things! :)
The strong light right in front of the garage reflects up and creates a nice even light source on the face.
Give it a try... if you can separate your model from the background enough and shoot with a low aperture (make sure you have plenty of light), it should create a great background for you, too.
Monday, January 24, 2011
Winter White Photography: How to Get Amazing Portraits in the Snow by Maris Ehlers, posted on the MCP Actions Blog!
Come check out my article on the fantastic MCP Actions Blog on getting great portraits in the snow. Perfect for this time of year, and sadly, perfect for all the snow we are living with here in Minnesota. I'm not a snowmobiler, so I might as well get something out of all of this white stuff!
The direct link is here. Stop by and share some love! :)
The direct link is here. Stop by and share some love! :)
Thursday, August 12, 2010
10 Tips and Tricks for Taking Better Pictures of Your Kids | Maris Ehlers Photography
One of the questions I get the most often is "How can I learn to take better pictures of my children?". It's a great question, because so many people discover a love of photography once they have a little one around to take cute pictures of (whether human or of the animal species).
I decided to create a list of 10 things you can do to take better pictures of your kids. This is from my perspective only, and I'm sure some people will think I've excluded something important, but:
a) it's my list
b) I limited it to ten items, and
c) these are all things that made a difference for me
Enjoy, and if you have any comments or questions after reading the list, be sure to post a comment and I'll respond directly.
10 Ways to Take Better Pictures of Your Kids:
1. Grab the kids, grab the camera.
One of the best way to get better pictures of your kids is to shoot more often. It’s a simple premise, really. Shoot pictures of anything and everything, everywhere, and you’ll start to find a groove. Did you take a picture last week that you like? What were you doing when you took it? When you see something on your screen that you like, do it again the next time you have your camera out. Maybe it will be a different subject or location, but try replicating what you DID when you took the picture you liked, and see if you like it even more this time.
2. Camera Light – 75% less weight and bulk.
For most families who want to take great pictures of their kids, I’d recommend an AWESOME point and shoot camera over a fancy-schmancy DSLR any day. Why? Mostly because of #1 above. When you have expensive gear or a camera you are afraid of or unsure how to use it, you’re less likely to use it with other people around, especially in locations where you are afraid it might get ruined (grains of sand in your lens joints, anyone?). Those point and shoots are great for on the go events and activities, so leave the bag of gear at home (or at the camera store) for now. A point and shoot will fit in your purse or soccer bag (or even in your pocket) and after you learn a few tips and tricks you’ll be surprised at what nice pictures you can take! Even after you’ve graduated to a DSLR (or if you already have one) use the heavier equipment when you aren’t crunched for time and you can practice and learn. Your daughter’s first Swan Lake
3. Don’t flash me!
This might surprise most of you, but for the most part, when I shoot outside I do not use flash. Most of the time, I don’t even have one on my camera. Flash is great when used correctly, don’t get me wrong: I couldn’t function without it at weddings and receptions. Flash can also be very beneficial to outdoor shots, but you have to know how and when to use it, and there are lots of other ways to get the light you need to take a great picture without blasting light in everyone’s eyes!

There is no better light than natural light. Look for indirect natural light, from open shade from trees, awnings or buildings, or even one diffused from a window. If I have to choose between an awesome backdrop or great natural light, I'll take the light every time. In this pic, the boy is actually in front of a garbage dumpster! It was a funky color and shaded on this side, and I love it.
4. Step away from the lights, ma’am.
You can’t do everything, and you can’t be the photographer of a scene and be in it as well. Well, at least not a busy scene filled with kids and activities. I find that when I’m taking pictures, I’m somewhat removed from the activity around me and I have a bit of tunnel vision. If I can't see it through my lens finder, then I don't notice it. For example, if I’m taking serious pictures at my son’s karate graduation, I end up missing out on some of the experience. I’d much rather bring a point and shoot and get some snapshots and still be present in the moment. I save the portraits of the big day for afterwards.
5. Tell me a story, please?
I think most of us would say that a pleasing photograph is one that draws us in, tells us a story. Some easy ways to do this when taking your own photographs is to:
- Frame your image with other elements in the picture
- Try moving your subject out of the center and off to the side one way or another. This is one of my favorite things to do. You still want you subject to be in focus, though.
- Have your subject looking at something else that is within your shot area.


The above two pictures definitely draw you in. First of all, the girl's haircut is super unique and unexpected, so the viewer immediately responds and starts asking questions, like "Why is her hair so short? What kind of music is she listening to? Where is she?", etc., etc. In the first image, I love the idea that while her haircut is so unusual, she's just like every other teen - immersed in her own little world, doing something that teenagers love (listening to music - loudly, no doubt) and totally unaware of the camera. In the second, you see this glimpse of a teenage girl enjoying a little girl moment in the library with a favorite Dr. Seuss book "Oh, The Places You'll Go!".
6. You and me, plus she and he.
Adding more than one person to a shot starts to tell a story, to show relationships. Showing them doing something other than looking at the camera (reading together, talking, laughing) and suddenly your picture has more elements of interest than a posed picture of everyone saying “cheese”!
In this image, I love that you can tell these kids have been working hard at enjoying their summer day. The smiles, dog in the background, kool-aid moustaches, wet hair and bodies and especially the thumbs up not only tell me this has been a great day, but it also reminds me of my own kool-aid summers of long ago. While technically speaking this photo isn't anything great, the story it tells makes it very special, indeed.

7. Texture-iffic!
Texture is a GREAT way to add depth and interest to a portrait. Fabric can be a great way to accomplish this – whether it is a patterned bedspread or quilt that a baby is lying on, a beautiful scarf on someone’s neck or head, or even a leather couch behind your subject, texture adds dimension.

8. Busy bees are happy bees.
While you may want to get some images of your daughter in her Halloween costume, she just might not want to stand still long enough for you to get those portraits you are thinking of. Relax, you both can be happy! Instead of making her stand on the front porch like every other kid in America
9. Up or down… you choose.
So many of us stand at our normal height and several feet away from our kids and snap pictures of them, and then wonder why our images don't look very interesting. Since our younger kids (and pets) are several feet shorter than we are, honestly, that "angle" that you're using is about the worst one there is. That's why! Try this instead:
Down – get down to their level so that the camera is shooting at their eye level. You’ll find that it dramatically changes the look of your image (same goes for pets).


Up – If you’re going to stand up and shoot, then get REALLY close so that you’re actually above them and shooting down on them. This works really well for pictures of individuals. You’ll be amazed at the perspective change and how it can make their eyes stand out.

10. Be Sneaky McSneakerson

10. Be Sneaky McSneakerson
Sometimes, you just gotta be sneaky. Don’t walk around with your camera up ready for battle. Keep it down, be subtle, walk around and let those kiddos relax. Seriously mom, no one wants to be stalked by a crazy lady with a camera when they are opening up their birthday presents in front of their friends. Wait until you see them doing something of interest and then just pop that baby up, snap-one-two, and back down you go. Movin’ on. They’ll get to where they don’t even notice you, and you’ll get some great candid shots for the scrapbook.
Wedding Pictures Editing Tips and Tricks | Maris Ehlers Photography
Courtney Johnson, one of the shooters working with me this summer, sent me two of her favorite images from our Sunflower Wedding session to edit.


In this next image, Courtney used a macro lens to get up close and capture some exquisite detail of the bouquet and ring. It's a really nice image. There seems to be a lack of focal point, however. The point of the image that is most in focus is part of the center of the flower (towards the outside of the dark brown), and the ring is not quite as in focus as it could or should be. The white balance is off a bit giving the flower petals a bit of a neon feel out in the sun.
In my edit, I did a couple of things. First of all, I cropped the image to make the ring the focal point. It still isn't as sharp as it should be, but I can't change that aspect. I then deepened the range of color, and added some intensity to the background, hopefully creating a more dynamic, 3 dimensional feel to the picture itself. Cropping can really make a big difference in the story an image tells. The top image is more about the flower, and the bottom one is more about the ring.
First of all, Courtney did a GREAT job at the shoot. I can already see her images changing in the few weeks we've been shooting together, and she's like a sponge, soaking it all in. I love her questions and her willingness to do just about anything that is needed, and I appreciate having her hang around.
In her original image here, I was in front shooting directly at the bride and groom. Courtney was shooting off to the side. That's the challenge of a 2nd shooter - they are typically asked to use a different lens and/or shoot from a different angle in order to not have two photographers shooting exactly the same thing.
I've decided I want to 2nd shoot a wedding with someone (something I've never done). As the main photographer, I have the responsibility to make sure that I have the required formal portraits and that the schedule is kept and that everything is captured, but the 2nd shooter gets to be very creative with their shooting if they wish, without the pressure. I think I might like that once or twice! Of course, the main photographer gets to tell you what to do, so then again... :)
Anyway, back to Courtney's image. Again, these images are compressed so a lot of the details and points that I will be talking about are more visible on the original (real) images than they are here. In the original image, the shading on the bride's face is much darker, and the background is blown out. The white balance is producing really strong greens and yellows (Courtney is working on that this week), and the front of the bride is blown out (meaning too bright and detail has been lost) as well. Having said that, the composition is what makes this picture. The almost kiss is just fabulous, and what I love about it is that look wasn't possible from the angle I was shooting at.

Here's my edit. This does look better in real life, but I'll explain it anyway. The firs thing I did was correct the white balance to reduce some of the sharp yellow-greens and make the tones more natural to that time of day. I then brought some extra brightness onto the bride's face and smoothed skin textures just a smidge. I vignetted the edges to create more of an area of focus around the bride and groom, and it also added to the drama a bit, I think.

In this next image, Courtney used a macro lens to get up close and capture some exquisite detail of the bouquet and ring. It's a really nice image. There seems to be a lack of focal point, however. The point of the image that is most in focus is part of the center of the flower (towards the outside of the dark brown), and the ring is not quite as in focus as it could or should be. The white balance is off a bit giving the flower petals a bit of a neon feel out in the sun.
 |
| original file as shot by courtney |
I should point out that all monitors do not see color the same. Mine is callibrated to my printer, so I adjusted tones and colors accordingly. If yours isn't callibrated, this bottom image may look overly dark and/or red.
Courtney, thanks for letting me play with the images from our session. You're doing great!
 |
| my edit |
Friday, July 30, 2010
Photo Editing Tips and Tricks | Maris Ehlers Photography
This summer I've been able to offer a few young photographers in my area an opportunity to tag along with me on a few shoots and do some second shooting with me. While it's fun to have them along, I also really want them to learn something that will be of help to them. Being a completely self-taught photographer myself, it can take forever to learn things when all you have is yourself, so I'm hoping this will give them a bit of a platform to spring from! You might be thinking, "Aw, isn't that so nice of her?" Ha. Well, it is I suppose, and hopefully fun for them, but I also get someone to help carry equipment, bags, etc., etc., and then I also get to share some of what I've learned which is fun for ME.


Here is the comparison between our edits:
Once I had my base edit completed, I was able to create an artistic edit that is dramatic, creates more emphasis on the eyes and creates a very powerful image.
Maris
Let's meet Nina.

Nina started following my work a few months ago and asked if she could tag along on some shoots. Our schedules hadn't worked out until this last week when she was able to join me for the shoot I did with Kaelie Lund (Alyssa Lund, also a blooming young photographer who shoots with me on occasion, also joined us but I haven't seen her images yet).
Nina is going to be a senior in high school, and is very focused on photography... she's even doing senior shoots for her classmates! You can see her facebook page here. If you stop by, please let her know I sent you. :)
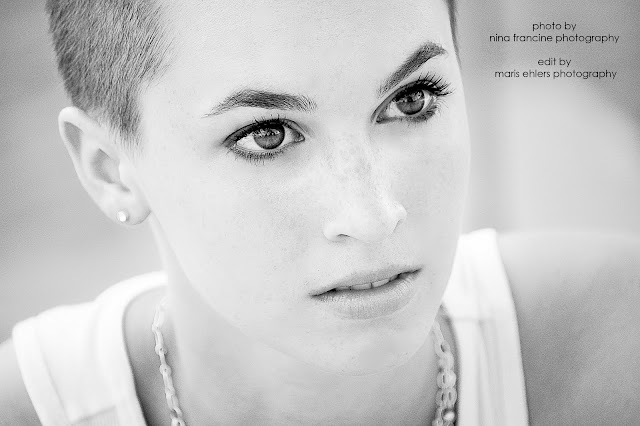
Nina got some great shots that evening, and she sent me two of her favorite images that she captured, in both the original and her edited formats, and has given me permission to also edit them. I've done a frame by frame comparison for one of the images below:
IT SHOULD BE NOTED THAT THE ORIGINAL FILES I HAVE ARE JPEGS, AND NOT RAW. RAW FILES PROVIDE YOU WITH MORE DATA AND INFORMATION TO WORK WITH, WHICH MEANS YOU HAVE MORE CONTROL OVER THE EDIT AND IMAGE.
IT SHOULD ALSO BE NOTED THAT THESE IMAGES ARE NOW COMPRESSED, SO SOME OF THE EFFECTS I AM WRITING ABOUT ARE LESS PROMINENTLY VISIBLE HERE THAN THEY ARE ON THE ORIGINAL FILES AND EDITS.
First, let's start with her original image:

All in all, a great shot. The composition is excellent, the angle is great, she's got nice clarity and detail on her subject's face, and she has a nice reflection of light on the subject's eyes. While it may be hard to see here, the original exposure is a little dark and the file has a lot of pinkish tones to it. This would suggest that the white balance wasn't quite as accurate as it could be. Not enough photographers understand that an accurate white balance can make the difference between a really nice picture and a great one! It's so much easier to get it right out of the camera than trying to create it in post, but that's a topic for another day.
Now, let's take a look at Nina's edit. Now, before you get all cranky thinking I'm being really hard on a sweet and talented high school girl, let me say that a) my critique is not meant to be negative of what she's done it's to show her some things she may not know or do, b) there's a certain amount of subjectivity that goes along with this and I have my own biases and preferences when it comes to edits, and c) she says she wants to learn and this is a way to teach her one-on-one. So, there. :)
 |
| Nina's Original Image and Her Edited Image |
This edit is very dramatic, but it's a little too heavy for my tastes, based on the lighting and style. The eyes are overly brightened (not as much as some do), but she's definitely gone overboard in whitening the eyes. They look unnatural at this point, and out of sync saturation and tone wise with the rest of the image. She's darkened up the file, which takes away from the wonderful evening light we were shooting in, and it creates a much heavier look around the subject's eyes (makeup), which I don't mind by itself, but with everything else it's just too much.
My belief is that editing, like wearing makeup, is best with the "less is more" approach, and yes, sometimes it's had for me to remember, too. Portraiture editing should look natural and clean IMHO, unless you are intentionally creating an over-the-top look for a specific purpose or style (which can be really cool!). Let's assume that in this situation, that is not the case. There are lots of photographers who specialize in crazy-ass editing (excuse my French), and they do it amazingly well. Like everything else though, you really need to know how to do it well to carry it off.
Anyway, back on topic:
The opportunity here for all photographers is to get your file in shape before you go all rockstar editor on it. The basic editing should be done first, to correct exposure, color, tone and blemishes. This is one way to both create stronger images from a technical standpoint (this can take very little time in Adobe Lightroom, btw), and then you can be very efficient (yes, even fast), in rolling out artistic edits to your files because the core image is in great shape. If you add heavy editing onto an image that isn't technically correct, you don't magically end up with a better image - it's flaws are still there!
Here was my crack at it:


1. I corrected exposure, bringing more even light on the subject, I corrected color to remove the overly pink tones in her original file, and for this example I chose a more neutral and desaturated skin color which looks lovely in a portrait. I also fixed some skin blemishes (but didn't remove any of those cute freckles), and simply smoothed her skin texture slightly.
 |
| Nina's Original and My Base Edit |
 |
| Nina's Edit vs My Base Edit |
Once I had my base edit completed, I was able to create an artistic edit that is dramatic, creates more emphasis on the eyes and creates a very powerful image.

In these two sets, my edit is the same - I am just showing it compared to both the original file and Nina's edit.
 |
| Nina's Original and My Artisitc Edit (after base edit was complete) |
 |
| Nina's Edit and My Artisitc Edit (after base edit was complete) |
Great job, Nina! Thanks for letting me show you a few of my tips and tricks. The image as you shot it has some really great "bones" and I hope you like what I brought out in the image through editing.
Stay tuned, everyone: I hope to do this same thing with two of my other second shooters yet this summer. Some of you may know who they are!
Maris
Thursday, July 29, 2010
Photo Editing Tips and Tricks | Maris Ehlers Photography
You may remember this image from the MEP July 2010 {YOUTHFUL} Photo Contest.

It was submitted by Cairith Turner of Bluhr Photography, located um, er, somewhere in Canada. When it came in, I immediately thought it would be a fun picture to edit, but thought I should wait until the contest was over before I took a swing at it. So, I of course asked for permission, and Cairith has generously allowed me to take significant liberties with her image and post it here.
What did I want to accomplish with my edit? Simply to make this image more dymanic, add depth, and overall, make it more compelling.
With that in mind, here is what I did:
1. Make her face and eye the focal point of the image
2. Add some color intensity to make it more vibrant and colorful.
3. Fix the funky skin color tones
4. Use contrast and light to show off the bokeh in the picture which makes her hair look like it is blowing in the wind, when it is likely that it is just depth of field. However, you can't really see that detail in the original image, and I wanted to bring that out!
Here is my version:

Here is what I did:
1. I imported the original into Adobe Lightroom 3.0, and simply made a virtual copy of the file.
2. I adjusted the exposure in order to bring more light onto the face.
3. I adjusted the tint of the image to remove some of the pinkness.
4. Adjusted the temperature to further move away from the heavy pink/red tones.
5. Gave the exposure one more tweek.
Each of these steps combined took less than 2 minutes. Here is what the image looked like at that point:

6. I exported the file into PS5.
7. I used the bandaid tool to remove the blemishes on her finger, forehead and under her eye.
8. I used MCP Actions "Eye Doctor" to brighten the Iris at about 40%.
9. I used MCP Actions "Magic Skin" at about 30% to create a smoother skin finish.
10. I used MCP Actions All in the Details "Magic Color Finder" to intensify the color of the grass behind her.
These steps took me about 8-10 minutes.
This is what it looked like when I was done in PS5.

11. I saved the changes (which sends the adjusted file back to Lightroom.
12. In Lightroom, I quickly created a vignette finish around the edges.
13. Lastly, I added a little warmth back into the file overall, which added the color wash to her hair, which I actually like.
These steps took about 30 seconds.
In total, I spent more time writing about the images on the blog than I did editing it. Total edit time: 12-13 minutes. I normally do not spend this much time editing a file (tip: if the white balance were more accurate for the ambient light when the photo was taken, steps 2-5, 10, and 13 may not have had to be done), and I typically prefer a lighter editing touch but the steps taken IMHO help the photograph realize more of it's potential!
I'd love to hear what you think about the original vs the edit. Discussions are a great way for all of us to learn!
Feel free to take a swag at editing the original file if you'd like and submit it to me via email at maris@marisehlersphotography.com and I will post it here with your step by step instructions. Not a contest, just fun learning together!
Also, if you find this post useful, helpful or informative in any way, please feel free to link to it on your blog or any social media site (i.e. facebook). Thanks!
A big thank you to Cairith and Lucy for being my guinea pig!
Cheers,
Maris
Subscribe to:
Posts (Atom)